Microsoft Word Reference Button Styles Bibliography With Shortcut Key
As of my last update in September 2021, Microsoft Word does not have a built-in feature specifically for creating bibliographies or reference lists with a single click or a "reference button" for button styles. However, it does offer some useful tools to help you manage your references and create a bibliography manually or with the help of citation management tools.
Here's a step-by-step guide to creating a bibliography in Microsoft Word using the built-in features:
Insert Citations:
Open your Word document.
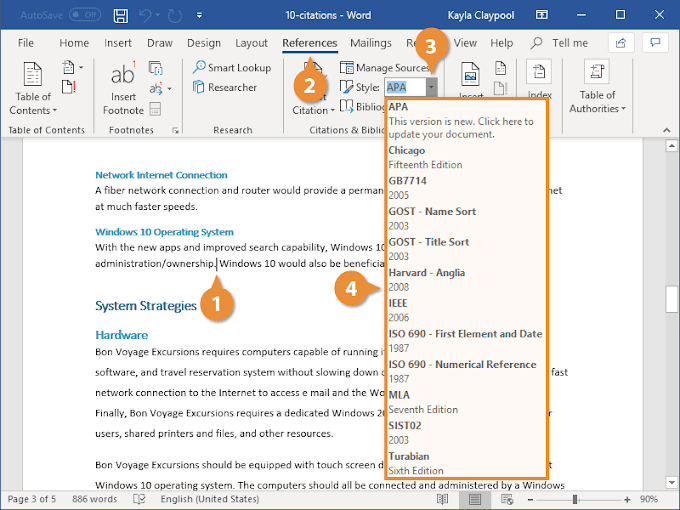
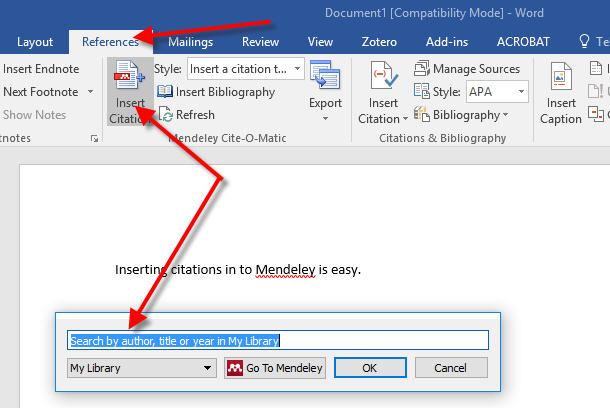
Click on the "References" tab in the top menu.
Add Sources:
Click on the "Manage Sources" button in the "References" tab.
In the "Source Manager" dialog box, click "New" to add a new source (book, journal article, website, etc.).
Fill in the required information for your source, such as author, title, publication date, etc.
Click "OK" to save the source.
Insert Citations into the Document:
Place the cursor where you want to insert a citation in your document.
Click on the "Insert Citation" button in the "References" tab.
Select the source you want to cite from the list.
The citation will be inserted into your document.
Create the Bibliography:
Place the cursor at the end of your document where you want the bibliography to appear.
Click on the "Bibliography" button in the "References" tab.
Choose the bibliography style you prefer from the list (APA, MLA, Chicago, etc.).
Microsoft Word will automatically generate the bibliography based on the sources you've cited in your document.
Please note that the exact steps and options may vary depending on the version of Microsoft Word you are using. Additionally, Microsoft may have introduced new features or changes beyond my last update.
If you prefer a more automated approach or require advanced citation management features, you may want to explore third-party citation management tools like EndNote, Zotero, or Mendeley. These tools can integrate with Microsoft Word and offer more robust bibliography and citation management capabilities.
ستمبر 2021 میں میری آخری اپ ڈیٹ کے مطابق، مائیکروسافٹ ورڈ میں خاص طور پر ایک کلک کے ساتھ کتابیات یا حوالہ جات کی فہرستیں بنانے کے لیے بلٹ ان فیچر نہیں ہے یا بٹن اسٹائل کے لیے "ریفرنس بٹن" ہے۔ تاہم، یہ آپ کے حوالہ جات کا نظم کرنے اور کتابیات کو دستی طور پر یا حوالہ جات کے انتظام کے ٹولز کی مدد سے بنانے میں مدد کے لیے کچھ مفید ٹولز پیش کرتا ہے۔
مائیکروسافٹ ورڈ میں بلٹ ان خصوصیات کا استعمال کرتے ہوئے کتابیات بنانے کے لیے یہاں ایک مرحلہ وار گائیڈ ہے:
اقتباسات داخل کریں:
اپنا ورڈ دستاویز کھولیں۔
اوپر والے مینو میں "حوالہ جات" ٹیب پر کلک کریں۔
ذرائع شامل کریں:
"حوالہ جات" ٹیب میں "ذرائع کا نظم کریں" کے بٹن پر کلک کریں۔
"ماخذ مینیجر" ڈائیلاگ باکس میں، نیا ماخذ (کتاب، جریدہ مضمون، ویب سائٹ، وغیرہ) شامل کرنے کے لیے "نیا" پر کلک کریں۔
اپنے ماخذ کے لیے مطلوبہ معلومات پُر کریں، جیسے مصنف، عنوان، اشاعت کی تاریخ وغیرہ۔
ماخذ کو بچانے کے لیے "OK" پر کلک کریں۔
دستاویز میں حوالہ جات داخل کریں:
کرسر کو وہاں رکھیں جہاں آپ اپنی دستاویز میں حوالہ داخل کرنا چاہتے ہیں۔
"حوالہ جات" ٹیب میں "حوالہ داخل کریں" کے بٹن پر کلک کریں۔
فہرست سے وہ ماخذ منتخب کریں جس کا آپ حوالہ دینا چاہتے ہیں۔
حوالہ آپ کے دستاویز میں داخل کیا جائے گا۔
کتابیات بنائیں:
کرسر کو اپنی دستاویز کے آخر میں رکھیں جہاں آپ چاہتے ہیں کہ کتابیات ظاہر ہو۔
"حوالہ جات" ٹیب میں "کتابیات" کے بٹن پر کلک کریں۔
فہرست میں سے اپنی ترجیحی کتابیات کا انداز منتخب کریں (APA، ایم ایل اے، شکاگو، وغیرہ)۔
مائیکروسافٹ ورڈ خود بخود کتابیات تیار کرے گا ان ذرائع کی بنیاد پر جن کا آپ نے اپنی دستاویز میں حوالہ دیا ہے۔
براہ کرم نوٹ کریں کہ مائیکروسافٹ ورڈ کے جو ورژن آپ استعمال کر رہے ہیں اس کے لحاظ سے درست اقدامات اور اختیارات مختلف ہو سکتے ہیں۔ مزید برآں، مائیکروسافٹ نے میری آخری اپ ڈیٹ سے آگے نئی خصوصیات یا تبدیلیاں متعارف کرائی ہیں۔
اگر آپ زیادہ خودکار طریقہ کو ترجیح دیتے ہیں یا اعلی درجے کی حوالہ جات کے نظم و نسق کی خصوصیات کی ضرورت ہے تو، آپ EndNote، Zotero، یا Mendeley جیسے فریق ثالث کے حوالہ جات کے انتظام کے ٹولز کو تلاش کرنا چاہیں گے۔ یہ ٹولز مائیکروسافٹ ورڈ کے ساتھ ضم ہو سکتے ہیں اور مزید مضبوط کتابیات اور حوالہ جات کے انتظام کی صلاحیتیں پیش کر سکتے ہیں۔


0 Comments